Controller Health Score - the composite benchmark
A controller benchmark measures the overall health of a gamepad by scoring its sticks, buttons, triggers, deadzone, latency, and connection stability in a single composite. Our free browser-based benchmark runs six weighted stages in about two minutes and produces the GPADLAB Controller Health Score - a 0-1000 number with a letter grade from S (950+) down to F (under 450), plus a shareable result card. GPADLAB Tournament Certification is GPADLAB's own benchmark standard for controller condition testing and pre-tournament checks; it is not accreditation or approval from a tournament organizer, league, console manufacturer, or independent certification body. No download required.
Work through the six measurement stages
Six weighted stages run in sequence
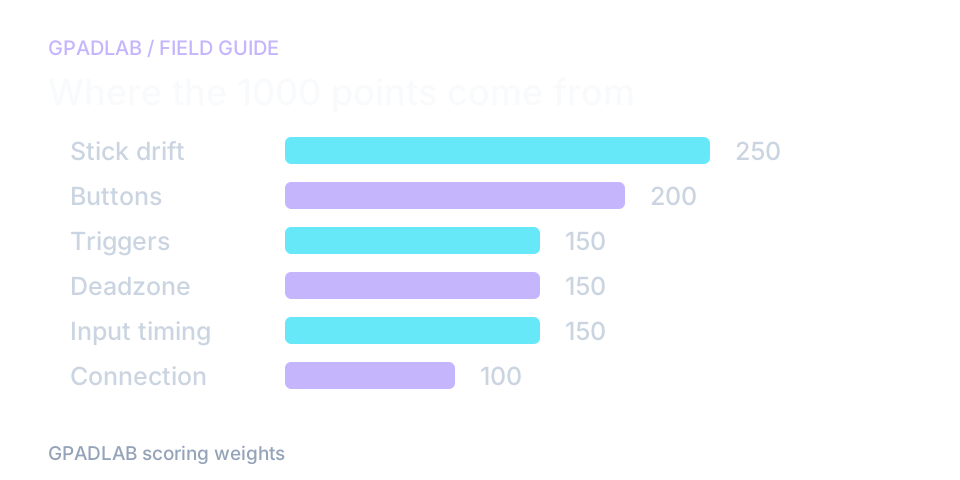
The benchmark runs stick drift (250 points, 25%), button response (200 points, 20%), trigger range (150 points, 15%), deadzone (150 points, 15%), latency (150 points, 15%), and connection stability (100 points, 10%). Each stage opens with a 3-second countdown and clear instructions; between stages the progress bar shows where you are in the suite.
Each stage produces a sub-score
Stages do not just pass or fail - they produce a continuous score within their point budget. A perfect stick rest earns the full 250 stick-drift points; a measured drift of 0.049 earns about 225; 0.10 lands around 175. Continuous scoring preserves more detail than a simple pass/fail result. GPADLAB does not currently upload benchmark runs to a community percentile database; aggregate percentile comparisons are a planned optional feature.
Connection type scales the thresholds
The benchmark detects whether the controller is wired, on Bluetooth, or on a 2.4GHz dongle, and scales the connection-stability thresholds accordingly. A wired controller is held to a strict standard (under 1% polling jitter is healthy); Bluetooth is allowed more variance (under 2% jitter is healthy) because the radio shares the crowded 2.4GHz band.
Stage scores sum to the composite
Sub-scores aggregate into a single Controller Health Score on a 0-1000 scale. If a stage is skipped - triggers and (eventually) rumble are the only skippable stages, for hardware like fight sticks that lack them - both the earned score and the maximum scale down. A run that skipped trigger range is graded against 850 instead of 1000.
Letter grade and GPADLAB certification standard
The score maps to a letter grade: S for 950 and above, A+ for 900, A for 825, B for 725, C for 600, D for 450, F below. GPADLAB Tournament Certification is GPADLAB's own benchmark standard for controller condition testing and pre-tournament checks. Runs with skipped stages are labeled GPADLAB Partial Certification in the live result. These labels describe GPADLAB's benchmark only and do not imply tournament-organizer acceptance, league accreditation, manufacturer approval, or independent third-party certification.
What each grade means
Grades are based on the percentage of attempted-stage points earned, scaled to a 1000-point display. The threshold is identical whether the run completed six stages or skipped one - a skipped run is graded against its own reduced maximum.
| Grade | Score Range | What It Represents |
|---|---|---|
| S | 950 - 1000 | Highest GPADLAB benchmark grade. The controller performed at near-perfect levels across the measured browser-observed signals in this run. Within GPADLAB Tournament Certification, S is the top grade band; it does not imply third-party accreditation or tournament-organizer approval. |
| A+ | 900 - 949 | Excellent condition. Minor measurement variance across one or two stages but no functional issues. Suitable for ranked and competitive play. |
| A | 825 - 899 | Review any stage that lost points. The total does not guarantee how the controller will behave in every game. |
| B | 725 - 824 | Functional with noticeable issues. Casual play is fine; precision genres (FPS, fighting, racing) may suffer. Worth troubleshooting the lowest-scoring stages. |
| C | 600 - 724 | Partial reliability. Multiple stages show problems. Recommend running the individual diagnostic tools to isolate the root cause, then weighing repair against replacement. |
| D | 450 - 599 | Significant degradation. Stick drift, button failures, or persistent dropouts likely. Repair viable on hot-swappable hardware; soldered designs usually favor replacement. |
| F | 0 - 449 | Review the stage breakdown and repeat unexpected results. A low total does not establish that replacement is needed. |
Use the six stage results before the total score
Two equal totals can hide different issues
One controller may lose points on stick input while another loses them on timing. Open the stage breakdown before deciding what to investigate.
Repeat the weakest stage on its own. A result that persists under the same conditions gives you a better starting point than the overall letter grade.
Keep a fair record of repeat runs
Use the same browser, display, controller settings, and connection method. Note whether the trigger stage was skipped; this version only allows that stage to be skipped.
Saved runs stay in this browser's local storage. They do not follow you to another device. The score cannot certify tournament eligibility, sensor lifespan, or the absence of every hardware fault.
Compatible controllers
Any controller the browser recognizes as a standard gamepad can be benchmarked. Fight sticks and arcade controllers without analog triggers can skip the trigger stage and receive a partial benchmark result.
Investigate the lowest-scoring stages
Related diagnostics
Benchmark questions
The Controller Health Score is a single 0-1000 number with a letter grade (S/A+/A/B/C/D/F) that summarizes the overall condition of a controller. It is calculated by running six weighted measurement stages - stick drift, button response, trigger range, deadzone, latency, and connection stability - and combining the per-stage scores into a composite. The full breakdown is published in our methodology document.
About two minutes for a complete run. Sampling stages take 5 to 30 seconds each (stick drift 5s, deadzone 10s, latency 10s, connection stability 30s), the button and trigger stages are user-driven and typically take 10 to 15 seconds, and there is a 3-second countdown between stages. Pause durations are included; total active sampling is around 80 seconds.
A grade of A (825) or higher is the realistic target for an everyday controller in good condition. A+ (900) is excellent. S (950+) is GPADLAB's highest benchmark grade and requires near-perfect performance across all six stages. GPADLAB Tournament Certification is GPADLAB's own benchmark standard; the grade does not represent approval or accreditation from an external tournament organizer or certification body.
This version lets you skip the trigger-range stage. Other stages remain part of the sequence. A skipped trigger stage changes the attempted-point total, so note it when comparing runs.
Movement technique, browser scheduling, system load, and connection conditions can change the result. There is no validated fixed run-to-run tolerance published for this tool. Repeat under the same conditions and compare the stage breakdown.
GPADLAB Tournament Certification is GPADLAB's own benchmark standard for controller condition testing and pre-tournament checks. It uses the same browser-based Controller Benchmark and GPADLAB grading system; runs with skipped stages are labeled GPADLAB Partial Certification. It is not accreditation from an esports league, tournament organizer, console manufacturer, or independent certification body, and the shareable result card should be presented as a GPADLAB benchmark result rather than organizer-approved proof.
Yes. The result panel includes a Share Score button that generates a 1200×630 image of your score, grade, controller name, and per-stage breakdown. On mobile and modern browsers it uses the native share sheet; on desktop it copies the image to your clipboard so you can paste it into Discord, Twitter, Reddit, or another platform. Sharing the image does not upload the benchmark result to a GPADLAB community database.
The benchmark is faster and produces a composite, but the individual tests are deeper. Each standalone tool - stick drift, deadzone, latency, and so on - surfaces detail the benchmark omits to stay fast: per-axis breakdowns, visualizations, threshold tables, and live feedback during sampling. For a quick overall health check or a shareable result, run the benchmark. For diagnosing a specific issue or understanding exactly what is failing, run the individual test for that issue.
The result panel saves up to ten runs in this browser's local storage. They do not sync to another browser or computer. You can choose to share a result card; that is separate from uploading benchmark history.
How we score the Controller Health Score
Six stages contribute up to 1000 points: drift 250, buttons 200, triggers 150, deadzone 150, timing 150, and connection 100. The trigger stage can be skipped. Grades use the share of attempted points. The stage breakdown matters more than the total for diagnosis. Results stay in this browser unless you choose to share a card.Dedicated methodology article not yet published; see the methodology hub for the methods currently available.